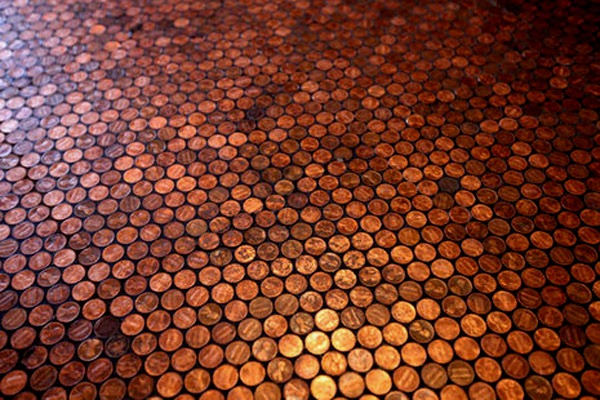
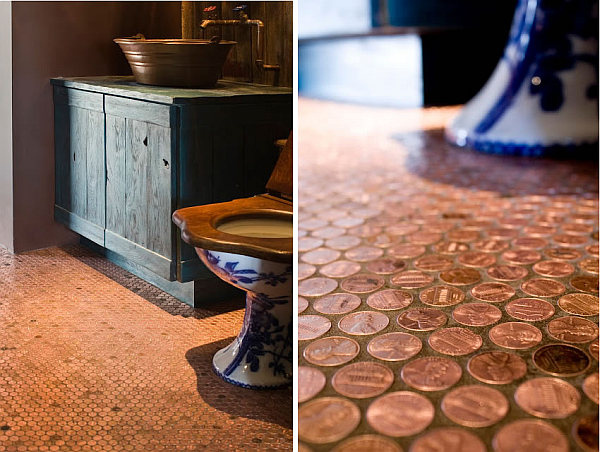
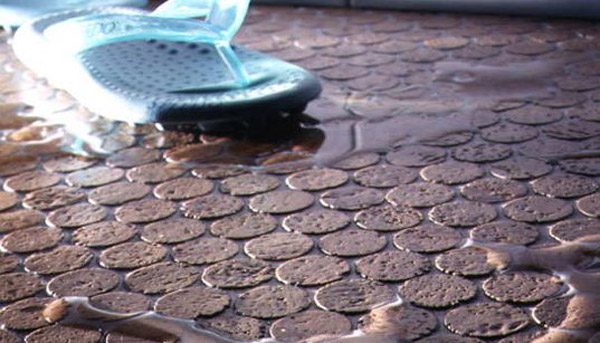
DIY Copper Penny Floor
Do you consider installing new flooring? If you have lots of spare pennies, then perhaps you should try the copper penny flooring. It is hip and handmade, but looks like a wonderful and luxurious flooring, cozy and stylish. Learn how to make your own copper penny flooring.
Tips on Penny Floor
It might sound cheap, but it is not actually really cheap. However it looks amazing, delicate and relatively easy to do. Here are some easy to follow tips on how to make the copper penny flooring.
- First of all, it is important to remove the old base molding, and after it is gone, you need to measure the perimeter, to find out how much of pennies you need. This is also important for preparing the needed amount of fiberlass pieces.
- Then, of course, as with any flooring, you have to create an even surface for your floor. This can be achieved by covering the bumps and empty spots with hydraulic cement, or any other materials.
- When your floor is almost ready for shiny pennies, you need to clean out the surface for fiberglass. Prepare your pennies and start sorting them out. They can be all shiny, or dull, or perhaps a mix of them. It is your floor after all.
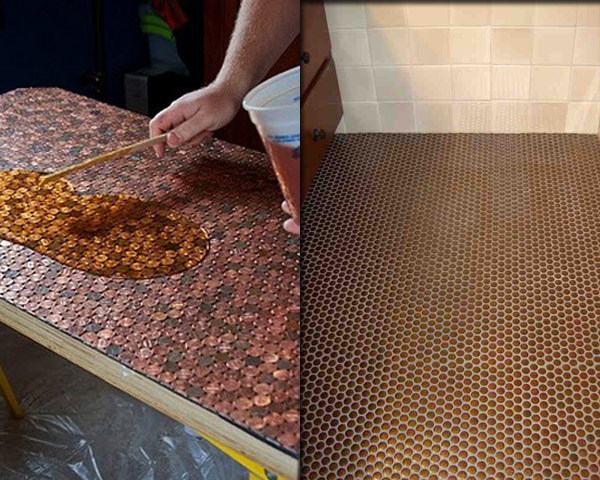
- Now, this is a crucial moment. In order to install your pennies, you need to have a self-sticking fiberglass to which the pennies would be applied. It is a common practice to use the standart sized 6”x6” or 12”x12” size fiberglass pieces. Now, when you have figured out how many fiberglass pieces you need, you can start putting your pennies on the sticky side of the fiberglass.
- Some sources indicate that the amount of pennies, but of course it might vary. One source said it took about $7.50 in pennies per square foot. So that’s quite a lot of pennies, but is still cheaper than making a customized flooring professionally. But of course it depends of the size of your floor, and your penny spacing.
- When you are done with installing pennies to the fiberglass, measure the supposed flooring using the fiberglass measurements. All of the pieces should lay out perfectly, but don’t install them to the floor yet.
- Before putting fiberglass to the floor you need to cover the pennies with epoxy-based transparent adhesive. Then, press another tile, so it can be all be covered with adhesive. Give the pennies of the fiberglass time to dry, which might last up to 6 hours.
- Remember how you measured the floor using the measurements of the fiberglass tiles? When you pennies are dry,it is time to install the tiles onto the floor. Cover the floor with epoxy-based clear adhesive to the marked areas of the supposed fiberglass tiles, which can be indicated by chalk. Now, place the tile into the floor and press. It should sit there firmly, so apply as much pressure as you can. This procedure must be repeated for all of the prepared fiberglass tiles. When finished, allow the time for the tiles to get attached and epoxy to dry, which might take about 6 hours as well.
- Now, the last step is to wipe away all the excess of adhesive with some water and grout. After three days, we are to finish our copper floor with two-part epoxy sealer with UV blocker to make the fiberglass tiles with pennies shine. This will help to preserve the initial look of your penny tiles.
As you see, the process is quite long, however the results might be really pleasing. Enjoy your nice and new penny floor!
Check out awesome penny floor:


How to Make Candlestick Out of Bottle
Cool Headboard Design Ideas on Budget
Ideas for Decorative Vases
Halloween Decor on Budget
DIY Interior Renovation
Transparent Panels In Flooring
Outdoor Decor: Repurposing Old Doors
Repurposing Old Drawers
Innovations in Design: 3D Floors
Turn Clutter Into Christmas Ornaments
Interior Decorations Made of Pasta
Lego: Cultural Phenomenon
The following two tabs change content below.

olga
Latest posts by olga (see all)
- Floating Sofa Collection by Karim Rashid - May 27, 2012
- DIY Wall Decor - May 27, 2012
- Tambour Table: To Keep Everything In Order - May 25, 2012
May 13th, 2012Category: Handmade
10 Responses to “DIY Copper Penny Floor”
Leave a Reply


 Color
Color Design Style
 Small Space
 Useful Tips

July 24th, 2012 at 12:25 am
Thanks for an interesting post. I find it interesting the amount I learn each day. Keep on blogging.
August 15th, 2012 at 7:00 am
Circles arranged in a hexagonal lattice provide approx 90.69% coverage, so for 1sqft coverage would be approx 130.6 sqin. A penny has a diameter of 0.75in which is 0.44 sqin. 130.6/0.44=296.81, which means if you put them together with no gaps it would take $2.97 per sqft
September 16th, 2012 at 5:47 am
What is the best adhesive if making a table from pennies? Can’t wait to do it.
October 4th, 2012 at 12:37 am
I love this fllor and would love to fo some of mine like this!
November 18th, 2012 at 2:15 pm
Again I ask where can i find the rolls of the fiberglass will someone please help me.
February 19th, 2013 at 11:29 pm
-Penny = .75″
– 12/.75 = 16 pennies per lineal foot.
– 16 x 16 = 256 pennies per square foot.
-256 pennies = $2.56
August 16th, 2013 at 1:22 am
You can buy the fiberglass on Amazon, HomeDepot, or Lowes
September 10th, 2013 at 9:08 pm
I watched a you tube video showing how you line up the pennies on a picture frame and cover with a clear contact paper. Worked very well- and much cheaper than the fiberglass mesh. Also, read where you can use Cabot spar varnish over the floor (used for boats, etc:) verses the thick epoxy… going to be putting this on in the next few days after the grout dries. 🙂
May 28th, 2014 at 8:47 pm
Hmmm it seems like your site ate my first comkment (it was extremely long) so
I guess I’ll just sum it up what I wrote and say, I’m thoroughly enjoying your blog.
I as well amm an aspiring blog writer but I’m still new to everything.
Do you have any helpful hints for newbie blog writers? I’d really
appreciate it.
August 20th, 2014 at 12:08 pm
I know this website provides quality based posts and other information, is there any other web site which
offers such data in quality?